Power Relay Test (Type A)
| -
|
Pliers will damage the relays, which
could cause the engine to stall or not
start. |
| -
|
Carefully remove the relay using the
relay
puller. | |
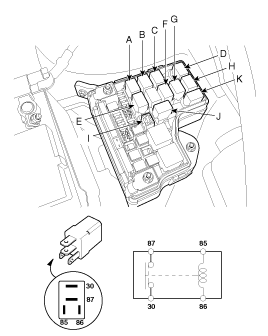
Check for continuity
between the terminals.
A : A/C
relay
B : Fuel pump relay
C : Blower relay
D : Buglar
alarm horn realy
E : Starter
relay
|
F : Front fog
rlay
G : Cooling fan relay
(LOW)
H : Multi purpose check
connector
I : Rear glass
defogger
J : Horn
relay
|
| 1. |
There should be continuity between the No.30
and No.87 terminals when power and ground are connected to the No.85
and No.86 terminals. |
| 2. |
There should be no continuity between the
No.30 and No.87 terminals when power is disconnected.

|
Power Relay Test (Type B)
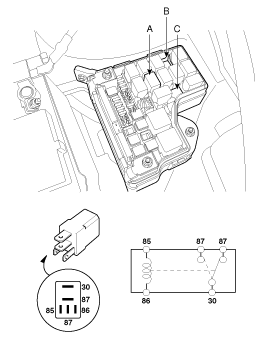
Check for continuity
between the terminals.
A : Front wiper
relay
B : Rear wiper
relay
C : Hill start assist
relay
| 1. |
There should be continuity between the No.30
and No.87 terminals when power and ground are connected to the No.85
and No.86 terminals. |
| 2. |
There should be continuity between the No.30
and No.87 terminals when power is disconnected.

|
Power Relay Test (Type C)
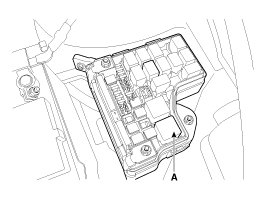
Check for continuity
between the terminals.
A : Engine control
relay
| 1. |
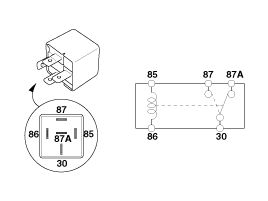
There should be continuity between the No.30
and No.87 terminals when power and ground are connected to the No.85
and No.86 terminals. |
| 2. |
There should be no continuity between the
No.30 and No.87 terminals when power is disconnected.

|
Fuse Inspection
| 1. |
Be sure there is no play in the fuse holders,
and that the fuses are held
securely. |
| 2. |
Are the fuse capacities for each circuits
correct? |
| 3. |
Are there any blown fuses?
If a fuse is to be replaced, be sure to use a
new fuse of the same capacity. Always determine why the fuse blew
first and completely eliminate the problem before installing a new
fuse. |
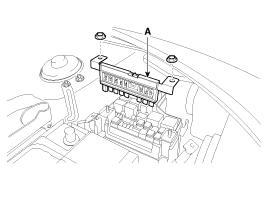
Multi Fuse
Multi Fuse is for
optimizing the engine room package.
| -
|
Multi fuse(A) is needed to replace
entirely when there is damage to only one
fuse. |
| -
|
When replacing the multi fuse, refer to
the "Engine compartment - component location" diagram
exactly. |
| -
|
Use the multi fuse capacities for each
circuits
correctly. | |