Smart Key Unit
| - |
Refer to the BE group - inspection / self
diagnosis with GDS. |
Smart Key Switch
| - |
Refer to the BE group - inspection / self
diagnosis with GDS. |
Antenna
| - |
Refer to the BE group - inspection / self
diagnosis with GDS. |
Tailgate Switch
| 1. |
Check for continuity between the Trunk lid
open switch terminals.
[with Back View
Camera]
1. Ground
2. Tailgate switch
[without Back View
Camera]
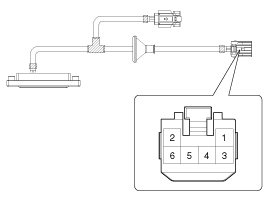
1. Ground (Tailgate)
2. Tailgate switch
3. Ground (Back View Camera)
4. Power
5. V-OUT
6. V-GND |
| 2. |
If continuity is not specified, inspect the
switch
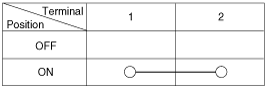
|
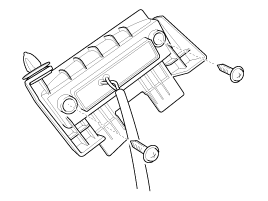
Smart key unit
| 1. |
Disconnect the negative(-) battery
terminal. |
| 2. |
Remove the AVN head unit.
(Refer to the BE group - "AVN system - AVN
Head Unit") |
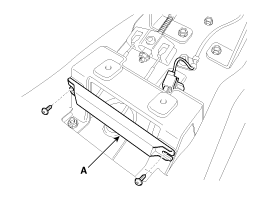
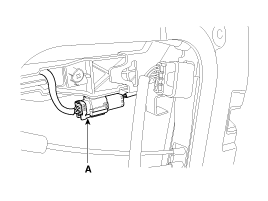
| 3. |
Remove the smart key unit(A) with loosening
bolt and nut, then disconnect the connector.
[USA]
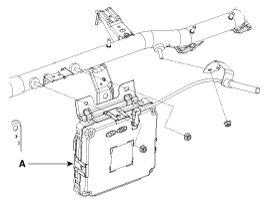
[CANADA]
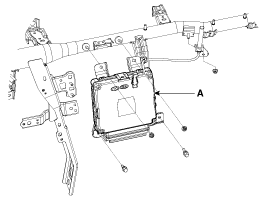
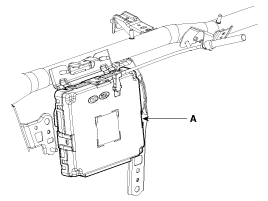
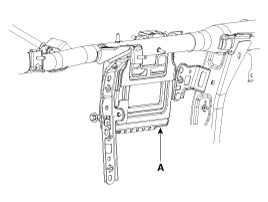
|
Interior #1 antenna
|
Take care not to scratch the crash pad and
related parts. |
| 1. |
Disconnect the negative(-) battery
terminal. |
| 2. |
Remove the console.
(Refer to the BD group -
"Console") |
| 3. |
Remove the multimedia
jack. |
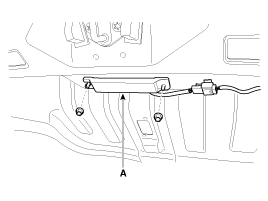
| 4. |
Disconnect the connector, then remove the
interior #1 antenna(A) after loosening 2 screws.
|
Interior #2 antenna
|
Take care not to scratch the crash pad and
related parts. |
| 1. |
Disconnect the negative(-) battery
terminal. |
| 2. |
Remove the console.
(Refer to the BD group -
"Console") |
| 3. |
Disconnect the connector, then remove the
interior #2 antenna(A) after loosening 2 screws.
|
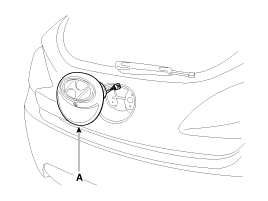
Trunk antenna
| 1. |
Disconnect the negative(-) battery
terminal. |
| 2. |
Remove the trunk transverse trim.
(Refer to the BD group - "Interior
trim") |
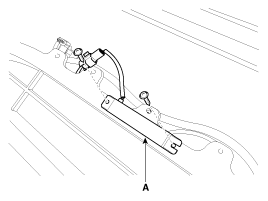
| 3. |
Disconnect the connector, then remove the
trunk antenna(A) after loosening 2 nuts.
|
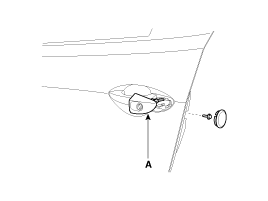
Exterior Bumper Antenna
| 1. |
Disconnect the negative(-) battery
terminal. |
| 2. |
Remove the rear bumper.
(Refer to the BD group - "Rear
bumper") |
| 3. |
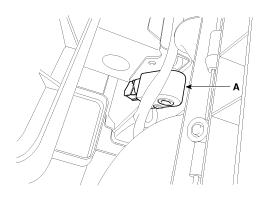
Disconnect the connector, then remove the rear
bumper antenna(A) after loosening 2 screws.
|
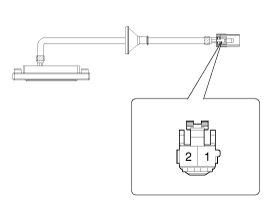
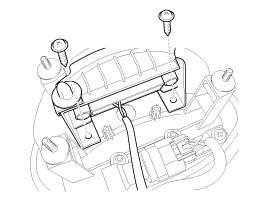
Buzzer
| 1. |
Disconnect the negative(-) battery
terminal. |
| 3. |
Remove the buzzer(A) after disconnecting the
connector.
|
Door outside handle
| 1. |
Disconnect the negative(-) battery
terminal. |
| 2. |
Remove the front door trim.
(Refer to the BD group - "Front
door") |
| 3. |
Remove the door outside handle
connector.
[Driver]

[Assistant]
|
| 4. |
Remove the outside handle cover(A) after
loosening the mounting bolt.
|
Tailgate switch
| 1. |
Disconnect the negative(-) battery
terminal. |
| 2. |
Remove the tailgate outside handle(A) after
loosening the mounting nut(3EA).
|
| 3. |
Remove the tailgate switch assembly after
loosening the screw(2EA).
|
| 4. |
Remove the tailgate switch after loosening the
screw(2EA).
|
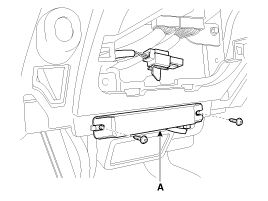
Smart Key Unit
| 1. |
Install the smart key
unit. |
| 2. |
Connect the connector and install the smart
key unit. |
| 3. |
Install the AVN head
unit. |
| 4. |
Install the negative (-) battery terminal and
check the smart key system. |
Interior #1 Antenna
| 1. |
Install the interior #1
antenna. |
| 2. |
Install the multimedia jack and the
console. |
| 3. |
Install the negative (-) battery terminal and
check the smart key system. |
Interior #2 Antenna
| 1. |
Install the interior #2
antenna. |
| 3. |
Install the negative (-) battery terminal and
check the smart key system. |
Trunk Antenna
| 1. |
Install the trunk
antenna. |
| 2. |
Install the trunk transverse
trim. |
| 3. |
Install the negative (-) battery terminal and
check the smart key system. |
Exterior Bumper Antenna
| 1. |
Install the exterior bumper
antenna. |
| 2. |
Install the rear
bumper. |
| 3. |
Install the negative (-) battery terminal and
check the smart key system. |
Buzzer
| 3. |
Install the negative (-) battery terminal and
check the smart key system. |
Door Outside Handle
| 1. |
Install the door outside
handle. |
| 2. |
Install the door
trim. |
| 3. |
Install the negative (-) battery terminal and
check the smart key system. |
Tailgate switch
| 1. |
Install the tailgate
switch. |
| 2. |
Install the tailgate outside
handle. |
| 3. |
Install the negative (-) battery terminal and
check the smart key
system. | |