| Shift Lever Assembly
Replacement |
| 1. |
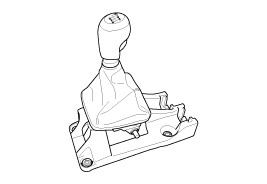
Remove the floor Interior console assembly.
(Refer to "Interior(Console)" in BD group)
|
| 2. |
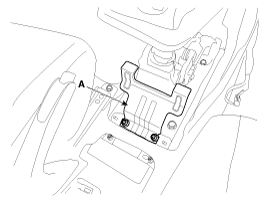
Remove the cover (A).
|
| 3. |
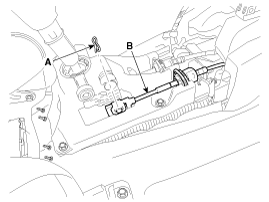
Remove the select cable (B) by removing the
snap pin (A).
|
| 4. |
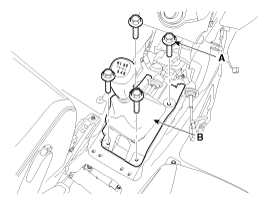
Remove the shift lever assembly (B) by
removing the bolts (A-4ea).
Tightening
torque:
9.8 ~ 14.7 N.m (1.0 ~ 1.5 kgf.m, 7.2 ~
14.5 lb-ft)
|
|
| 5. |
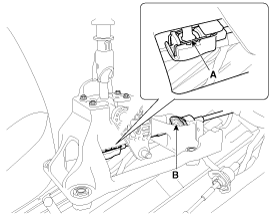
Remove the shift cable (B) by removing the
clip (A).
|
| 6. |
Installation is the reverse of removal.
|
| Select / Shift Cable
Replacement |
| 1. |
Remove the floor Interior console assembly.
(Refer to "Interior(Console)" in BD group)
|
| 2. |
Remove the cover (A).

|
| 3. |
Remove the select cable (B) by removing the
snap pin (A).

|
| 4. |
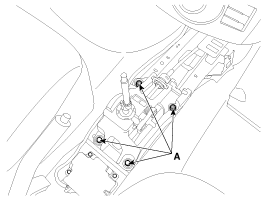
Remove the shift lever assembly (B) by
removing the bolts (A-4ea).
Tightening
torque:
9.8 ~ 14.7 N.m (1.0 ~ 1.5 kgf.m, 7.2 ~
14.5 lb-ft)
|
|
| 5. |
Remove the shift cable (B) by removing the
clip (A).


|
| 6. |
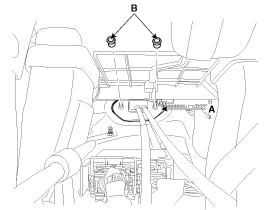
Remove the retainer (A) and nuts
(B-2ea).
Tightening
torque:
11.8 ~ 14.7 N.m (1.2 ~ 1.5 kgf.m, 8.7 ~
10.8 lb-ft)
|
|
| 7. |
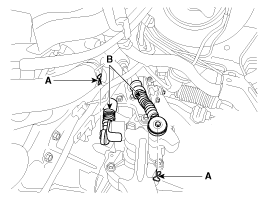
Disconnect the select and shift cable assembly
(B) after removing the pin (A).
|
| 8. |
Remove the shift cable and select cable at
cabin room. |
| 9. |
Installation is the reverse of removal.
|
[Shift / Select Cable Installation Tips]
| 1. |
Install the select and shift cable assembly
(B) after removing the pin (A).
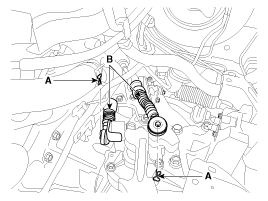
|
| 2. |
Install is the shift cable (A).
|
At this time, have to disconnect select
cable. |
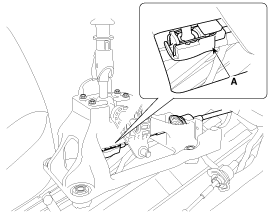
|
| 3. |
Install is the shift lever assembly
(A).
Tightening torque:
8.8 ~ 13.7 N.m (0.9 ~ 1.4 kgf.m, 6.5 ~
10.1 lb-ft)
|
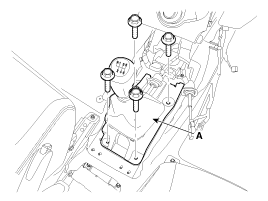
|
| 4. |
Shift to the 3th gear position.
|
| 5. |
Insert the selected cable (A) to the shift
lever assembly pin (B). |
| 6. |
You have to push in the adjuster (C).
|
| 7. |
Remove the neutral position pin (D).
|
| 8. |
Install the snap pin (E).
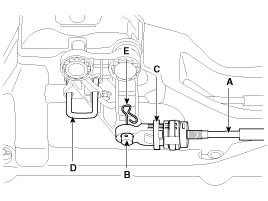
|
| 1. |
Check the select cable for proper operation
and for damage. |
| 2. |
Check the shift cable for proper operation and
for damage. |
| 3. |
Check the boots for damage.
|
| 4. |
Check the boots for wear abrasion sticking,
restricted movement or damage. |
| 5. |
Check for the weak or damaged spring.
|
| 1. |
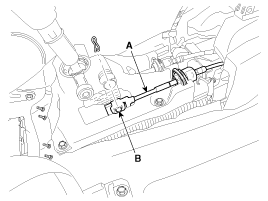
In neutral position, disjoin select cable (A)
from shift lever assembly pin (B).
|
| 2. |
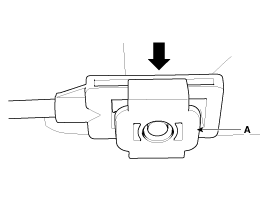
Disconnect select adjuster (A) to an
arrow.
|
| 3. |
Shift to the 3th gear position.
|
| 4. |
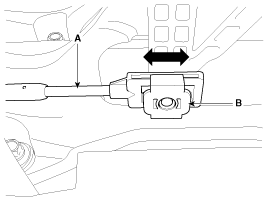
Adjustment adjuster (B) on select cable (A) as
rolling from side to side.
|
| 5. |
Insert on free load and press the
adjuster. |
| 6. |
After shifting 2nd gear, cheking the left
select gap about 1mm(if not, loop no, 1~5)
|
If there are still gate blocking in
spite of re-adjustment, shift lever assembly stopper stoke
must be
cheked. | |
| 7. |
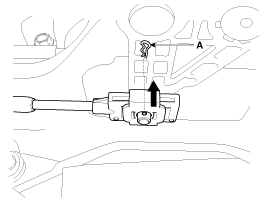
In neutral position, join by clip
(A).
|