| 1. |
Remove the rear wheel & tire.
Tightening
torque:
88.3 ~ 107.9 N.m (9.0 ~ 11.0 kgf.m, 65.1
~ 79.6 lb-ft)
| |
| 2. |
Release the parking lever and parking brake
cable is loose. |
| 3. |
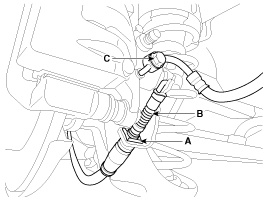
Remove the parking brake cable (B), after
removing the clip (A).
|
Parking brake lever in the car must be
in fully loosened position.
| |
| 4. |
Remove the hose eyebolt (C).
Tightening
torque:
Brake hose to caliper (C):
24.5 ~ 29.4 N.m (2.5 ~ 3.0 kgf.m, 18.1 ~
21.7 lb-ft)
| |
| 5. |
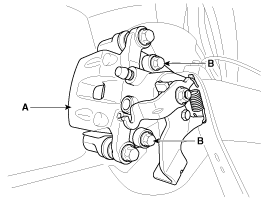
Loosen the caliper mounting bolts (B), then
remove the rear caliper assembly (A).
Tightening
torque:
Caliper assembly to
carrier:
63.7 ~ 73.5 N.m (6.5 ~ 7.5 kgf.m, 47.0 ~
54.2 lb-ft)
|
|
| 6. |
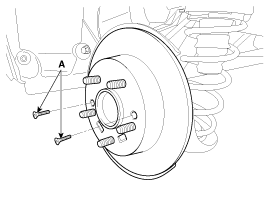
Remove the rear brake disc by loosening the
screws (A).
Tightening
torque:
4.9 ~ 5.8 N.m (0.5 ~ 0.6 kgf.m, 3.6 ~
4.3 lb-ft)
|
|
| 1. |
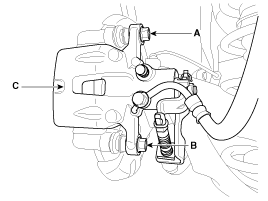
Loosen the guide rod bolts (A,B) and then
remove the rear caliper body (C).
Tightening
torque:
21.6 ~ 31.4 N.m (2.2 ~ 3.2 kgf.m, 15.9
~23.1 lb-ft)
|
| •
|
Where necessary prevent the guide
rods from rotating with an appropriate wrench.
|
| •
|
Be careful not to damage the dust
covers.
| | |
| 2. |
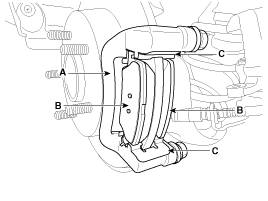
Replace pad retainers (C) and brake pads (B)
in the caliper carrier (A).
| •
|
Clean the pad retainer surface at
the caliper bracket. |
| •
|
Inspect the piston boots for
damage and replace if necessary.
|
| •
|
Check the smooth action of the
guide rods, and their dust covers for damage.
| | |
| Rear Brake Disc
Thickness Check |
| 1. |
Check the brake pads for wear and
fade. |
| 2. |
Check the brake disc for damage and
cracks. |
| 3. |
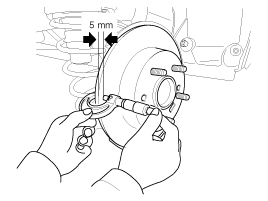
Remove all rust and contamination from the
surface, and measure the disc thickness at 8 points, at least, of
same distance (5mm) from the brake disc outer circle.
Brake disc
thickness
Standard: 10 mm (0.394 in)
Service limit: 8.4 mm (0.331
in)
Deviation: less than 0.01 mm (0.00039
in)
|
|
| 4. |
If wear exceeds the limit, replace the discs
and pad assembly left and right of the
vehicle. |
| 1. |
Check the pad wear. Measure the pad thickness
and replace it, if it is less than the specified value.
Pad
thickness
Standard value: 10 mm (0.394
in)
Service limit: 2.0 mm (0.0787
in)
| |
| 2. |
Check the damage of pad, backing metal and
contamination with grease.
|
| Rear Brake Disc Runout
Check |
| 1. |
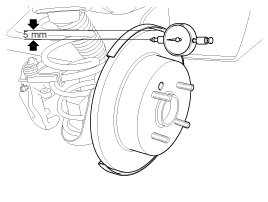
Place a dial gauge about 5mm (0.2 in.) from
the outer circumference of the brake disc, and measure the runout of
the disc.
Brake disc
runout
Limit: 0.03 mm (0.0012 in.) or less (new
one)
|
|
| 2. |
If the runout of the brake disc exceeds the
limit specification, replace the disc, and then measure the runout
again. |
| 3. |
If the runout exceeds the limit specification,
install the brake disc after turning it 180° and then check the
runout of the brake disc again. |
| 4. |
If the runout cannot be corrected by changing
the position of the brake disc, replace the brake
disc. |
| 1. |
Installation is the reverse of
removal. |
| 2. |
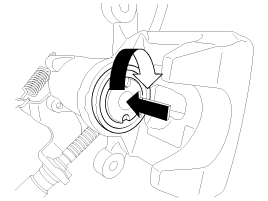
Rotate the caliper piston and push the
direction of the arrow.
| •
|
Wind the piston into the caliper
body until it is fully retracted.
|
| •
|
Do not use any power assisted
tools for this task. |
| •
|
Manually insert new screws from
the brake pad and tighten the leading-pin bolt(A) first
with specified torque, following this tighten the
trailing-pin bolt(B) in the same manner.
| |

|
| 3. |
After installation, bleed the brake system.
(Refer to Brake system bleeding)
| •
|
Bring the brake pads in their
operating position by pressing the brake pedal down
(half of normal pedal travel) several times until there
is resistance. |
| •
|
In order to bed the brake pads to
the brake disc and ensure performance and endurance, the
vehicle user must be instructed to avoid heavy braking
or sustained periods with the brakes applied, for the
first 200km(124mile) after installing new pads.
|
| •
|
Re-setting of the parking brake is
necessary after overhauling the caliper body, or if the
brake calipers, caliper body, parking brake cable or
brake discs have been changed.
| | | |