| •
|
Use fender covers to avoid damaging
painted surfaces. |
| •
|
To avoid damage, unplug the wiring
connectors carefully while holding the connector
portion. | |
|
Mark all wiring and hoses to avoid
misconnection. |
|
In case of removing the high pressure fuel
pump, high pressure fuel pipe, delivery pipe, and injector, there
may be injury caused by leakage of the high pressure fuel. So don’t
do any repair work right after engine stops.
|
| 1. |
Remove the drive belt.
(Refer to Timing System - "Drive
Belt") |
| 2. |
Remove the drive belt idler.
(Refer to Timing System -
"Idler") |
| 3. |
Remove the alternetor.
(Refer to Engine Electrical System -
"Alternator") |
| 4. |
Remove the alternetor bracket.
(Refer to Engine Electrical System -
"Alternator") |
| 5. |
Remove the engineroom under
cover. |
| 6. |
Remove the crankshaft damper
pulley.
(Refer to Timing System - Crankshaft Damper
Pulley") |
| 7. |
Remove the water pump.
(Refer to Cooling System - "Water
Pump") |
| 8. |
Remove the air cleaner assembly.
(Intake and Exhaust System - "Air
Cleaner") |
| 9. |
Remove the high pressure fuel
pump.
(Refer to Fuel System - "High Pressure Fuel
Pump") |
| 10. |
Remove the cylinder head cover.
(Refer to Cylinder Head Assembly - "Cylinder
Head Cover") |
| 11. |
Remove the engine mounting support
bracket.
(Refer to Engine And Transaxle Assembly -
"Engine Mounting") |
| 12. |
Remove the timing chain cover(A).
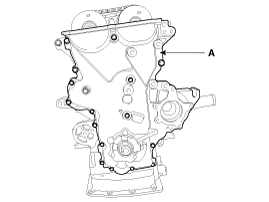
|
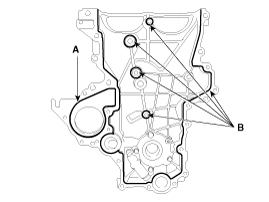
| 1. |
Install the timing chain cover.
| (1) |
Before installing, remove the hardened
sealant from the cylinder block and ladder frame
surface. |
| (2) |
Apply the liquid gasket(TB 1217H or
LOCTITE 5900H) on the surface between the cylinder head and
the cylinder block.
Width :
3 ~ 5mm
(0.1181~0.1969in.)
|
|
| (3) |
Apply the liquid gasket, THREE BOND
1282B or THREE BOND 1216E on the water pump contact parts (A)
of the timing chain cover and THREE BOND 1217H or LOCTITE
5900H on the rest parts (B).
Reassemble the cover within 5
minutes.
Width :
3.5 ~ 4.5 mm (0.1378 ~ 0.1772
in)
|
|
Remove oil or dust on the surface
surely. | |
| (4) |
Align the dowel pin of the cylinder
block and the holes of the oil
pump. |
| (5) |
Tighten the bolts to install the timing
chain cover (A).
Tightening torque
M8 bolts :
18.6 ~ 23.5 N.m (1.9 ~ 2.4 kgf.m,
13.7 ~ 17.4 lb-ft)
M6 bolts :
9.8 ~ 11.8 Nm (1.0 ~ 1.2 kgf.m,
7.2 ~ 8.7 lb-ft)
|
| |
| 2. |
Install in the reverse order of removal.
| |