Engine removal is not
required for this procedure.
| •
|
Use fender covers to avoid damaging
painted surfaces. |
| •
|
To avoid damaging the cylinder head,
wait until the engine coolant temperature drops below normal
temperature before removing
it. |
| •
|
When handling a metal gasket, take care
not to fold the gasket or damage the contact surface of the
gasket. |
| •
|
To avoid damage, unplug the wiring
connectors carefully while holding the connector
portion. | |
|
Mark all wiring and hoses to avoid
misconnection.
|
| 1. |
Remove the engine
cover. |
| 2. |
Disconnect the battery negative
terminal. |
| 3. |
Remove the air duct and air cleaner
assembly.
(Refer to Intake and Exhaust System - "Air
Cleaner") |
| 4. |
Disconnect the mounting bracket and then
remove the battery.
(Refer to Engine Electrical System -
"Battery") |
| 5. |
Disconnect the ECM connector and then remove
the battery tray.
(Refer to Engine Electrical System -
"Battery") |
| 6. |
Remove the battery tray.
(Refer to Engine Electrical System -
"Battery") |
| 7. |
Remove the engineroom under
cover. |
| 8. |
Loosen the drain plug and drain the coolant.
Open the radiator cap to make rapid draining.
(Refer to Cooling System -
"Coolant") |
| 9. |
Remove the radiator upper hose and lower
hose.
(Refer to Cooling System - Radiator
Hose") |
| 10. |
Disconnect the intercooler inlet and outlet
hose.
(Refer to Intake and Exhaust System -
"Intercooler Pipe and Hose") |
| 11. |
Disconnect the engine wiring connector and
haness clamp and then remove the cylinder head protector and wiring
from engine.
| A. |
Turbo charger solenoid valve
connector |
| B. |
Exhuast OCV(Oil Control Valve)
connector |
| C. |
Ignition connector #
1,2,3,4 |
| D. |
FPCV(Fuel Pressure Control Valve)
connector |
| F. |
Exhuast CMPS(Cam position Sensor)
connector |
| G. |
Intake CMPS(Cam Positoin Sensor)
connector
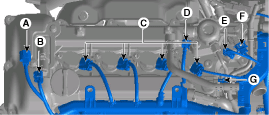
|
| H. |
Injector Extension
connector |
| I. |
PCSV(Purge Control Solenoid Valve)
connector |
| J. |
Intake OCV(Oil Control Valve)
connector |
| L. |
A/C compressor switch
connector |
| M. |
MAPS (Map Sensor)
connector |
| N. |
Knock Sensor
connector |
| P. |
CKPS(Crank Shaft Position Sensor)
connector |
| Q. |
vacuum Pump Extension
connector |
| R. |
ETC(Electric Throttle Control) Module
connector
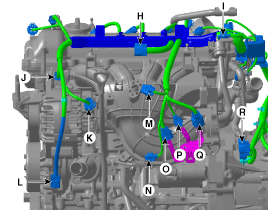
|
| S. |
WTS(Water Temperature Sensor)
connector |
| U. |
Front Oxygen Sensor
connector |
| V. |
Rear Oxygen Sensor
connector
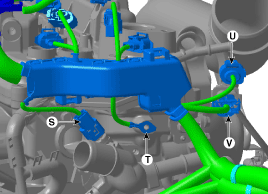
| |
| 12. |
Disconnect the heater hose(A) and brake
booster vacuum hose(B).
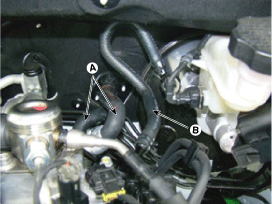
|
| 13. |
Remove the vacuum pipe
assembly(A).
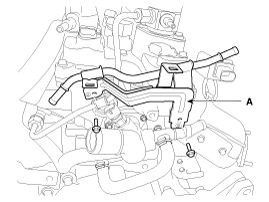
|
| 14. |
Remove the cylinder head cover.
(Refer to Cylinder Head Assembly - "Cylinder
Head Cover") |
| 15. |
Remove the timing chain cover.
(Refet to Timing System - "Timing Chain
Cover") |
| 16. |
Remove the timing chain.
(Refer to Timing System - "Timing
Chain") |
| 17. |
Remove the camshaft.
(Refer to Cylinder Head Assembly -
"Camshaft") |
| 18. |
Remove the intake manifold.
(Refer to Intake And Exhaust System - "Intake
Manifold") |
| 19. |
Remove the turbo manifold.
(Refer to Intake And Exhaust System - "Exhaust
Manifold") |
| 20. |
Remove the delivery pipe
assembly.
(Refer to Fuel System - "Delivery
Pipe") |
| 21. |
Disconnect the bypass hose, and then remove
the water temperature control assembly.
(Refer to Cooling System - "Water Temperature
Control Assembly") |
| 22. |
Remove the heater pipe.
(Refet to Cooling System - "Water
Pipe") |
| 23. |
Remove the intake OCV(Oil Control
Valve).
(Refer to Fuel System - "CVVT Oil Control
Valve") |
| 24. |
Remove the rear hanger (A).
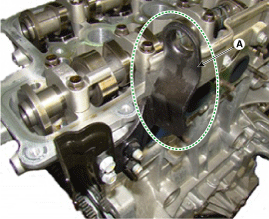
|
| 25. |
Remove the cylinder head cover heat protector
(A).
|
| 26. |
Remove the cylinder head bolts, then remove
the cylinder head.
| (1) |
Uniformly loosen and remove the 10
cylinder head bolts, in several passes, in the sequence
shown.
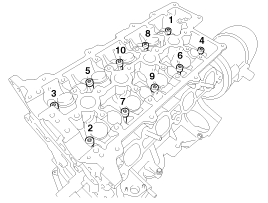
|
Head warpage or cracking could
result from removing bolts in an incorrect
order. | |
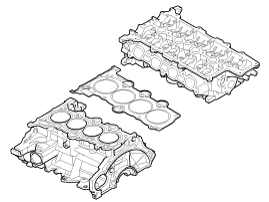
| (2) |
Lift the cylinder head from the cylinder
block and put the cylinder head on wooden blocks.
|
Be careful not to damage the
contact surfaces of the cylinder head and cylinder
block. | | |
|
Identify MLA(Mechanical lash adjuster),
valves, valve springs as they are removed so that each item can be
reinstalled in its original
position. |
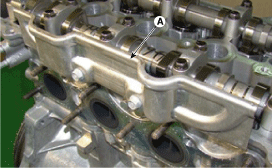
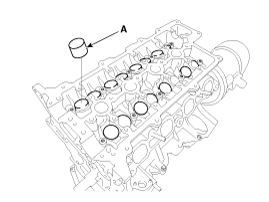
| 1. |
Remove the MLAs (A).
|
When removing MLAs, mark all the MLAs
for their rearrangement. |
|
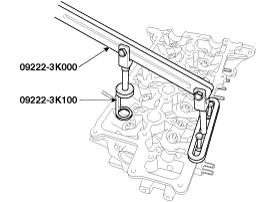
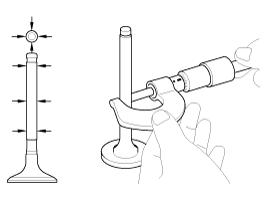
| 2. |
Remove the valves.
| (1) |
Using the SST (09222 - 3K000, 09222 -
3K100), compress the valve spring and remove the retainer
lock.
|
| (2) |
Remove the spring
retainer. |
| (3) |
Remove the spring
retainer. |
| (5) |
Remove the valve stem
seal. |
| (6) |
Using a magnetic pickup tool, remove the
spring seat.
|
Do not reuse the valve stem
seals. | | |
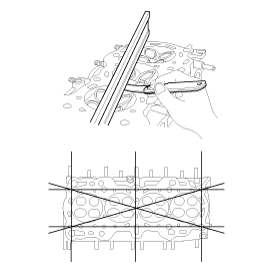
| 1. |
Inspect for flatness.
Using a precision straight edge and feeler
gauge, measure the surface the contacting the cylinder block and the
manifolds for warpage.
Flatness of
cylinder head gasket surface
Standard :
Less than 0.05mm (0.0020in) for total
area
Less than 0.02mm (0.0008in) for a
section of 100mm (3.9370in) X 100mm
(3.9370in)
|
|
| 2. |
Inspect for cracks.
Check the combustion chamber, intake ports,
exhaust ports and cylinder block surface for cracks. If cracked,
replace the cylinder head. |
Valve And Valve Spring
| 1. |
Inspect the valve stems and valve
guides.
| (1) |
Using a caliper gauge, measure the inner
diameter of valve guide.
Valve
guide inner diameter :
5.500 ~ 5.512mm (0.2165 ~
0.2170in)
|
|
| (2) |
Using a micrometer, measure the outer
diameter of valve stem.
Valve
stem outer diameter
Intake : 5.465 ~ 5.480mm (0.2152 ~
0.2157in)
Exhaust : 5.458 ~ 5.470mm (0.2149
~ 0.2154in)
|
|
| (3) |
Subtract the valve stem outer diameter
measurement from the valve guide inner diameter
measurement.
Valve
stem- to-guide clearance
Intake : 0.020 ~ 0.047mm (0.0008 ~
0.0019in)
Exhaust : 0.030 ~ 0.054mm (0.0012
~ 0.0021in)
|
If the clearance is greater than
specification, replace the valve or the cylinder
head. | |
| 2. |
Inspect the valves.
| (1) |
Check the valve is ground to the correct
valve face angle. |
| (2) |
Check that the surface of valve for
wear. If the valve face is worn, replace the
valve. |
| (3) |
Check the valve head margin thickness.
If the margin thickness is less than
minimum, replace the valve.
Margin
Standard
Intake : 1.10mm
(0.0433in)
Exhaust : 1.26mm
(0.0496in)
|
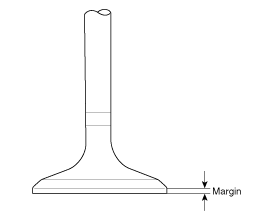
|
| (4) |
Check the length of valve.
Valve
length
Standard
Intake : 93.15mm (3.6673
in)
Exhaust : 92.60mm (3.6457
in)
| |
| (5) |
Check the surface of valve stem tip for
wear. If the valve stem tip is worn, replace the
valve. | |
| 3. |
Inspect the valve seats.
| (1) |
Check the valve seat for evidence of
overheating and improper contact with the valve face. If the
valve seat is worn, replace the cylinder head.
|
| (2) |
Check the valve guide for wear. If the
valve guide is worn, replace the cylinder
head. | |
| 4. |
Inspect the valve springs.
| (1) |
Using a steel square, measure the
out-of-square of valve
spring. |
| (2) |
Using a vernier calipers, measure the
free length of valve spring.
Valve
spring
Standard
Free height : 45.1mm
(1.7756in)
Out of square : Less than
1.5°
|

| |
| •
|
Thoroughly clean all parts to be
assembled. |
| •
|
Before installing the parts, apply fresh
engine oil to all sliding and rotating
surface. |
| •
|
Replace oil seals with new
ones.
| |
| 1. |
Install the valves.
| (1) |
Install the spring
seats. |
| (2) |
Using the SST (09222 - 2B100), push in a
new oil seal.
| • |
Do not reuse old valve stem
oil seals. |
| • |
Incorrect installation of
the seal could result in oil leakage past the
valve
guides. | |
|
Intake valve stem seals are
different from exhaust ones in type.
Do not reassembly ones in the
other's places.
| |
| (3) |
Install the valve, valve spring and
spring retainer, after applying engine oil at the end of each
valve.
|
When installing valve springs, the
enamel coated side should face the valve spring
retainer. | | |
| 2. |
Using the SST(09222 - 3K000, 09222 - 3K100),
compress the spring and install the retainer locks.
After installing the valves, ensure that the
retainer locks are correctly in place before releasing the valve
spring compressor.
|
When installing the SST, use the torque,
1.2kgf.m or
less. | |
| 3. |
Lightly tap the end of each valve stem two or
three times with the wooden handle of a hammer to ensure proper
seating of the valve and retainer
lock. |
| 4. |
Install the MLA(Mechanical lash
adjuster)s.
Check that the MLA (A) rotates smoothly by
hand.
|
All the MLAs must be installed in its
original
position. | |
| •
|
Thoroughly clean all parts to be
assembled. |
| •
|
Always use a new cylinder head and
manifold gasket. |
| •
|
Always use a new cylinder head
bolt. |
| •
|
The cylinder head gasket is a metal
gasket. Take care not to bend
it. |
| •
|
Rotate the crankshaft, set the No.1
piston at TDC.
| |
| 1. |
Install the cylinder head
assembly.
| (1) |
Before installing, remove the hardened
sealant from the cylinder block and cylinder head
surface. |
| (2) |
Before installing the cylinder head
gasket, apply sealant on the upper surface of the cylinder
block and reassemble the gasket within five
minutes.
|
Refer to the illustration for
applying sealant. |
Width
: 2.0 ~
3.0mm(0.0787~0.1181in.)
Position
: 1.0 ~
1.5mm(0.0394~0.0591in.)
Specification : TB
1217H or LOCTITE 5900H
|
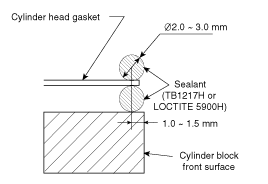
|
| (3) |
After installing the cylinder head
gasket on the cylinder block, apply sealant on the upper
surface of the cylinder head gasket and reassemble in five
minutes. | |
| 2. |
Place the cylinder head carefully not to
damage the gasket.
|
| 3. |
Install the cylinder head bolts with
washers.
| (1) |
Tighten the 10 cylinder head bolts, in
several passes, in the sequence shown.
Tightening torque :
29.4Nm (3.0kgf.m, 21.7lb-ft) + 90°
+ 90°
|
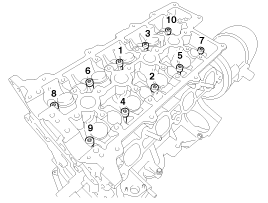
|
Always use new cylinder head
bolts. | | |
| 4. |
Install the head cover heat protector
(A).
Tightening
torque :
9.8 ~ 11.8N.m (1.0 ~ 1.2kgf.m, 7.2 ~
8.7lb-ft)
|
|
| 5. |
Install the rear hanger (A).
|
| 6. |
Install the oil control
valve(OCV).
(Refer to Fuel System - "CVVT Oil Control
Valve (OCV)") |
| 7. |
Install the heater pipe.
(Refer to Cooling System - "Water
Pipe") |
| 8. |
Install the weter control assembly, and bypass
hose.
(Refer to Cooling System - "Water Control
Assembly") |
| 9. |
Install the delivery pipe
assembly.
(Refer to Fuel System - "Delivery
Pipe") |
| 10. |
Install the intake manifold.
(Refer to Intake And Exhaust System - "Intake
Manifold") |
| 11. |
Install the turbo manifold.
(Refer to Intake And Exhaust System - "Exhaust
Manifold") |
| 12. |
Install the cam shaft.
(Refer to Cylinder Head Assembly - "Cam
Shaft") |
| 13. |
Install the timing chain.
(Refer to Timing System - "Timing
Chain") |
| 14. |
Install the timing chain cover.
(Refer to Timing System - "Timing Chain
Cover) |
| 15. |
Install the cylinder head cover.
(Refer to Cylinder Head Assembly - "Cylinder
Head Cover")
|
Do not reuse the disassembled
gasket. | |
| 16. |
Install the vacuum pipe assembly
(A).
Tightening
torque :
9.8 ~ 11.8N.m (1.0 ~ 1.2kgf.m, 7.2 ~
8.7lb-ft)
|
|
| 17. |
Connect the brake booster vacuum hose (A) and
heater hose (B).
|
| 18. |
Install in the reverse order of removal.
|
|
Perform the following :
| •
|
Refill engine with engine
oil. |
| •
|
Refill a radiator and a reservoir tank
with engine coolant. |
| •
|
Inspect for fuel leakage.
|
| -
|
After assemble the fuel line, turn on
the ignition switch (do not operate the starter) so that the
fuel pump runs for approximately two seconds and fuel line
pressurizes. |
| -
|
Repeat this operation two or three
times, then check for fuel leakage at any point in the fuel
line. |
| •
|
Bleed air from the cooling
system. |
| -
|
Start engine and let it run until it
warms up. (until the radiator fan operates 3 or 4
times.) |
| -
|
Turn Off the engine. Check the level in
the radiator, add coolant if needed. This will allow trapped
air to be removed from the cooling
system. |
| -
|
Put radiator cap on tightly, then run
the engine again and check for
leaks. | | |