Engine removal is
required for this procedure.
(Refer to Engine and
transaxle assembly removal in this group)
| 1. |
MT : Remove the flywheel.
(Refet to Cylinder Block -
"Flywheel") |
| 2. |
AT : Remove the drive plate.
(Refet to Cylinder Block - "Drive
Plate") |
| 3. |
Remove the engine to engine stand for
disassembly. |
| 4. |
Remove the timing chain.
(Refet to Timing System - "Timing
Chain") |
| 5. |
Remove the cylinder head.
(Refet to Cylindet Head Assembly - "Cylinder
Head") |
| 6. |
Remove the water jacket.
(Refer to Cylinder Block - "Water
Jacket") |
| 7. |
Remove the oil level gauge
tube. |
| 8. |
Remove the knock sensor (A) and the oil filter
(B).
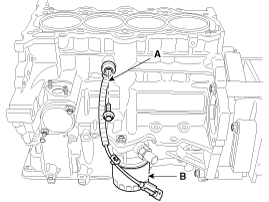
|
| 9. |
Remove the oil pressure switch.
(Refet to Lubrication System - "Oil Pressure
Switch") |
| 10. |
Remove the oil pan.
(Refer to Lubrication System - "Oil
Pan") |
| 11. |
Remove the oil screen (A).
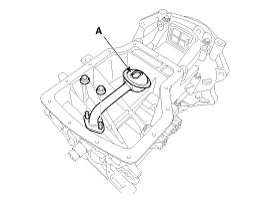
|
| 12. |
Remove the rear oil seal.
(Refet to Cylinder Block - "Rear Oil
Seal") |
| 13. |
Remove the ladder frame(A).
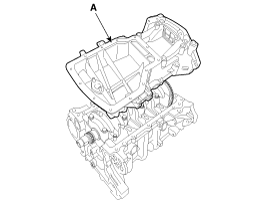
|
| 14. |
Check the connecting rod end
play. |
| 15. |
Remove the connecting rod caps and check oil
clearance. |
| 16. |
Remove the piston and connecting rod
assemblies.
| (1) |
Using a ridge reamer, remove all the
carbon from the top of the
cylinder. |
| (2) |
Push the piston, connecting rod assembly
and upper bearing through the top of the cylinder
block.
| • |
Keep the bearings,
connecting rod and cap
together. |
| • |
Arrange the piston and
connecting rod assemblies in the correct
order. | | | |
| 17. |
Remove the crankshaft bearing cap and check
oil clearance. |
| 18. |
Check the crankshaft end
play. |
| 19. |
Lift the crankshaft (A) out of the engine,
being careful not to damage journals.
|
Arrange the main bearings and thrust
bearings in the correct
order. |
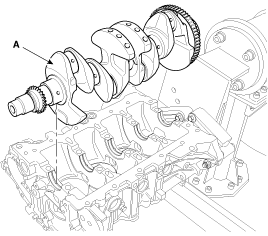
|
| 20. |
Remove the piston cooling jet
(A).
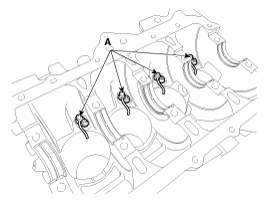
|
| 21. |
Check fit between piston and piston
pin.
Try to move the piston back and forth on the
piston pin.
If any movement is felt, replace the piston
and pin as a set. |
| 22. |
Remove the piston rings.
| (1) |
Using a piston ring expander, remove the
2 compression rings. |
| (2) |
Remove the 2 side rails and coil
spring.
|
Arrange the piston rings in the
correct order
only. | | |
| 23. |
Remove the connecting rod from the
piston.
Using a press, remove the piston pin from
piston.
(Press-in load : 500 ~ 1,500kg(1,102 ~
3,306lb)) |
| Connecting Rod And
Crankshaft |
| 1. |
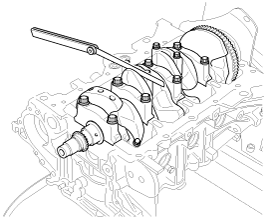
Check the connecting rod end
play.
Using feeler gauge, measure the end play while
moving the connecting rod back and forth.
End
play
Standard : 0.10 ~ 0.25mm (0.0039 ~
0.0098in)
Maximum : 0.35mm
(0.0138in)
|
| •
|
If out-of-tolerance, install a new
connecting rod. |
| •
|
If still out-of-tolerance, replace
the
crankshaft. | | |
| 2. |
Check the connecting rod bearing oil
clearance.
| (1) |
Check the match marks on the connecting
rod and cap are aligned to ensure correct
reassembly. |
| (2) |
Remove the 2 connecting rod cap
bolts. |
| (3) |
Remove the connecting rod cap and lower
bearing. |
| (4) |
Clean the crankshaft pin journal and
bearing. |
| (5) |
Place a plastigage across the crankshaft
pin journal. |
| (6) |
Reinstall the lower bearing and cap, and
tighten the bolts. Do not reuse the bolts.
Tightening torque :
17.7 ~ 21.6N.m (1.8 ~ 2.2kgf.m,
13.0 ~ 15.9lb-ft) + 88 ~ 92°
|
|
Do not turn the
crankshaft. | |
| (7) |
Remove the 2 bolts, connecting rod cap
and lower bearing . |
| (8) |
Measure the plastigage at its widest
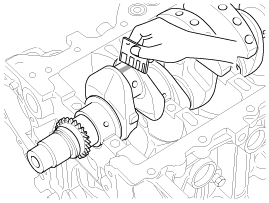
point.
Standard
oil clearance
0.032 ~ 0.052mm (0.0013 ~
0.0020in)
|
|
| (9) |
If the measurement from the plastigage
is too wide or too narrow, remove the upper and lower bearing
and then install a new bearings with the same color
mark.
Recheck the oil clearance.
|
Do not file, shim, of scrape the
bearings or the caps to adjust
clearance. | |
| (10) |
If the plastigage shows the clearance is
still incorrect, try the next larger or smaller
bearing.
|
If the proper clearance cannot be
obtained by using the appropriate larger or smaller
bearings, replace the crankshaft and restart
over. |
|
If the marks are indecipherable
because of an accumulation of dirt and dust, do not
scrub them with a wire brush or scraper. Clean them only
with solvent or
detergent. |
Connecting Rod
Mark Location
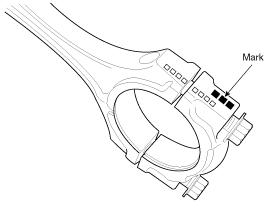
Discrimination Of Connecting Rod
Mark
|
Connecting rod
big-end
inner diameter
|
A, 0
|
45.000 ~ 45.006mm (1.7717 ~
1.7719in)
|
B, 00
|
45.006 ~ 45.012mm (1.7719 ~
1.7721in)
|
C, 000
|
45.012 ~ 45.018mm (1.7721 ~
1.7724in)
|
Crankshaft Pin
Diameter Mark Location
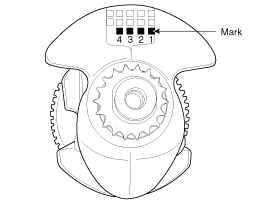
Discrimination Of Crankshaft Pin Diameter
Mark
|
Crankshaft pin
outer diameter
|
1
|
41.954 ~ 41.960mm (1.6517 ~
1.6520in)
|
2
|
41.966 ~ 41.960mm (1.6522 ~
1.6520in)
|
3
|
41.960 ~ 41.954mm (1.6520 ~
1.6517in)
|
Connecting Rod
Bearing Color Location
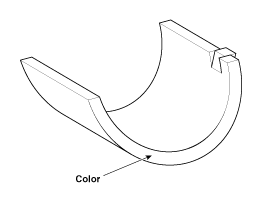
Discrimination Of Connecting Rod Bearing
Mark
|
Color
|
Connecting rod
bearing thickness
|
A
|
Blue
|
1.514 ~ 1.517mm (0.0596 ~
0.0597in)
|
B
|
Black
|
1.511 ~ 1.514mm (0.0595 ~
0.0596in)
|
C
|
None
|
1.508 ~ 1.511mm (0.0594 ~
0.0595in)
|
D
|
Green
|
1.505 ~ 1.508mm (0.0593 ~
0.0594in)
|
E
|
Red
|
1.502 ~ 1.505mm (0.0591 ~
0.0593in)
|
|
| (11) |
Select the bearing by using selection
table.
Connecting Rod Bearing Selection Table
|
Connecting rod
mark
|
A, 0
|
B, 00
|
C, 000
|
Crank shaft pin journal mark
|
1
|
E
(Red)
|
D
(Green)
|
C
(None)
|
2
|
D
(Green)
|
C
(None)
|
B
(Black)
|
3
|
C
(None)
|
B
(Black)
|
A
(Blue)
|
| |
| 3. |
Check the connecting rods.
| (1) |
When reinstalling, make sure that
cylinder numbers put on the connecting rod and cap at
disassembly match. When a new connecting rod is installed,
make sure that the notches for holding the bearing in place
are on the same side. |
| (2) |
Replace the connecting rod if it is
damaged on the thrust faces at either end. Also if step wear
or a severely rough surface of the inside diameter of the
small end is apparent, the rod must be replaced as
well. |
| (3) |
Using a connecting rod aligning tool,
check the rod for bend and twist. If the measured value is
close to the repair limit, correct the rod by a press. Any
connecting rod that has been severely bent or distorted should
be replaced.
Allowable bend of connecting rod
:
0.05mm / 100mm (0.0020in / 3.94in
) or less
Allowable twist of connecting rod
:
0.10mm / 100mm (0.0039in / 3.94in)
or less
|
|
When the connecting rods installed
without bearings, there should be no difference on side
surface. | | |
| 4. |
Check the crankshaft bearing oil
clearance.
| (1) |
To check main bearing-to-journal oil
clearance, remove the main bearing caps and lower
bearings. |
| (2) |
Clean each main journal and lower
bearing with a clean shop
towel. |
| (3) |
Place one strip of plastigage across
each main journal. |
| (4) |
Reinstall the lower bearings and caps,
then tighten the bolts.
Tightening torque :
17.7~21.6Nm (1.8~2.2kgf.m,
13.0~15.9lb-ft) + 88~92°
|
|
Do not turn the
crankshaft. | |
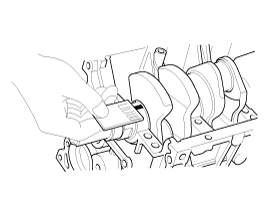
| (5) |
Remove the cap and lower bearing again,
and measure the widest part of the plastigage.
Standard
oil clearance :
No.1, 2, 3, 4, 5 : 0.021 ~ 0.042mm
(0.0008 ~ 0.0017in)
|
|
| (6) |
If the plastigage measures too wide or
too narrow, remove the upper and lower bearing and then
install a new bearings with the same color mark. (Refer to
crankshaft main bearing selection table in this
Group).
Recheck the oil clearance.
|
Do not file, shim, or scrape the
bearings or the cap to adjust
clearance. | |
| (7) |
If the plastigage shows the clearance is
still incorrect, try the next larger or smaller bearing.
(Refer to crankshaft main bearing selection table in this
Group).
Recheck the oil clearance.
|
If the proper clearance cannot be
obtained by using the appropriate larger or smaller
bearings, replace the crankshaft and start
over. |
|
If the marks are indecipherable
because of an accumulation of dirt and dust, do not
scrub them with a wire brush or scraper. Clean them only
with solvent or detergent.
|
Cylinder block
crankshaft journal bore mark location
Letters have been stamped on the side
surface of the block as a mark (A) for the size of each of the
5 main journal bores.
Use them, and the numbers or letters
stamped on the crank (marks for main journal size), to choose
the correct bearings.
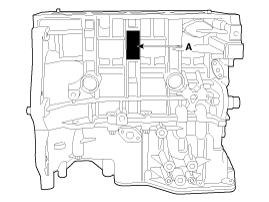
Discrimination Of Cylinder Block Crankshaft Journal
Bore
Mark
|
Cylinder block
crankshaft journal bore
inner
diameter
|
A
|
52.000 ~ 52.006mm (2.0472 ~
2.0475in)
|
B
|
52.006 ~ 52.012mm (2.0475 ~
2.0477in)
|
C
|
52.012 ~ 52.018mm (2.0477 ~
2.0479in)
|
Crankshaft Main
Journal Mark Location
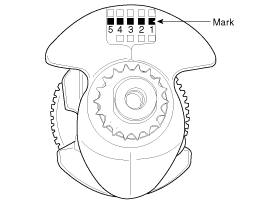
Discrimination Of Crankshaft Main Journal
Mark
|
Crankshaft main
journal
outer diameter
|
1
|
47.960 ~ 47.954mm (1.8882 ~
1.8879in)
|
2
|
47.954 ~ 47.948mm (1.8879 ~
1.8877in)
|
3
|
47.948 ~ 47.942mm (1.8877 ~
1.8875in)
|
Crankshaft Main
Bearing Color Location
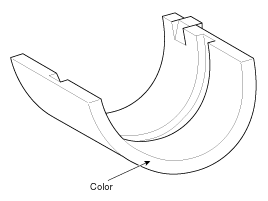
Discrimination Of Crankshaft Main Bearing
Mark
|
Color
|
Crankshaft main
bearing thickness
|
No.1, 2, 3, 4,
5
|
A
|
Blue
|
2.026 ~ 2.029mm (0.0798 ~
0.0799in)
|
B
|
Black
|
2.023 ~ 2.026mm (0.0796 ~
0.0798in)
|
C
|
None
|
2.020 ~ 2.023mm (0.0795 ~
0.0796in)
|
D
|
Green
|
2.017 ~ 2.020mm (0.0794 ~
0.0795in)
|
E
|
Red
|
2.014 ~ 2.017mm (0.0793 ~
0.0794in)
|
|
| (8) |
Select the bearing by using selection
table.
Crankshaft Main Bearing Selection Table
|
Cylinder block
crankshaft journal bore mark
|
A
|
B
|
C
|
Crank shaft main journal mark
|
1
|
E
(Red)
|
D
(Green)
|
C
(None)
|
2
|
D
(Green)
|
C
(None)
|
B
(Black)
|
3
|
C
(None)
|
B
(Black)
|
A
(Blue)
|
| |
| 5. |
Check the crankshaft end play.
Using a dial indicator, measure the thrust
clearance while prying the crankshaft back and forth with a
screwdriver.
End
play
Standard: 0.05 ~ 0.25mm (0.0020 ~
0.0098in)
Limit : 0.30mm
(0.0118in)
|
If the end play is greater than maximum,
replace the center bearing. |
Cylinder Block
| 1. |
Remove the gasket material.
Using a gasket scraper, remove all the gasket
material from the top surface of the cylinder
block. |
| 2. |
Clean the cylinder block
Using a soft brush and solvent, thoroughly
clean the cylinder block. |
| 3. |
Inspect the top surface of cylinder block for
flatness.
Using a precision straight edge and feeler
gauge, measure the surface contacting the cylinder head gasket for
warpage.
Flatness of cylinder block gasket
surface
Standard :
Less than 0.05mm (0.0020in) for total
area
Less than 0.02mm (0.0008in) for a
section of 100mm (3.9370in) X 100mm
(3.9370in)
|
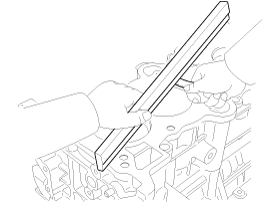
|
| 4. |
Inspect the cylinder bore.
Visually check the cylinder for vertical
scratchs.
If deep scratchs are present, replace the
cylinder block. |
| 5. |
Inspect the cylinder bore
diameter.
Using a cylinder bore gauge, measure the
cylinder bore diameter at position in the thrust and axial
direction.
Standard
diameter :
77.00 ~ 77.03mm (3.0315 ~
3.0327in)
|
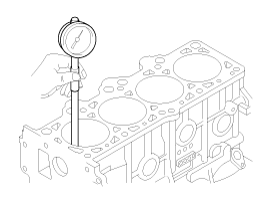
|
| 6. |
Check the cylinder bore size code on the
cylinder block side surface.

Discrimination Of Cylinder Bore Size
Mark
|
Cylinder bore inner
diameter
|
A
|
77.00 ~ 77.01mm (3.0315 ~
3.0319in)
|
B
|
77.01 ~ 77.02mm (3.0319 ~
3.0323in)
|
C
|
77.02 ~ 77.03mm (3.0323 ~
3.0327in)
|
|
| 7. |
Check the piston size mark (A) on the piston
top face.
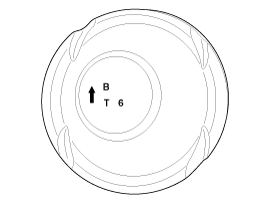
A : Grade
T : Gasoline engine (T-GDI)
6 : 1.6L
Discrimination Of Piston Outer Diameter
Mark
|
Piston outer
diameter
|
A
|
76.97 ~ 76.98mm (3.0303 ~
3.0307in)
|
B
|
76.98 ~ 76.99mm (3.0307 ~
3.0311in)
|
C
|
76.99 ~ 77.00mm (3.0311 ~
3.0315in)
|
|
| 8. |
Select the piston related to cylinder bore
class.
Piston
-to-cylinder clearance :
0.02 ~ 0.04mm (0.0008 ~
0.0016in)
| |
Piston And Piston Rings
| 1. |
Clean the piston.
| (1) |
Using a gasket scraper, remove the
carbon from the piston top. |
| (2) |
Using a groove cleaning tool or broken
ring, clean the piston ring
grooves. |
| (3) |
Using solvent and a brush, thoroughly
clean the piston.
| |
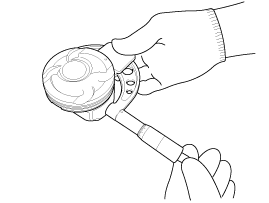
| 2. |
The standard measurement of the piston outside
diameter is taken 12mm(0.4724in) from bottom land of the
piston.
Standard
diameter :
76.97 ~ 77.00mm (3.0303 ~
3.0315in)
|
|
| 3. |
Calculate the difference between the cylinder
bore inner diameter and the piston outer diameter.
Piston-to-cylinder clearance :
0.02 ~ 0.04mm (0.0008 ~
0.0016in)
| |
| 4. |
Inspect the piston ring side
clearance.
Using a feeler gauge, measure the clearance
between new piston ring and the wall of ring groove.
Piston ring
side clearance
No.1 ring : 0.04 ~ 0.08mm (0.0016 ~
0.0031in)
No.2 ring : 0.04 ~ 0.08mm (0.0016 ~
0.0031in)
Oil ring : 0.02 ~ 0.06mm (0.0008 ~
0.0024in)
Limit
No.1 ring : 0.1mm
(0.0039in)
No.2 ring : 0.1mm (
0.0039in)
Oil ring : 0.2mm (
0.0079in)
|
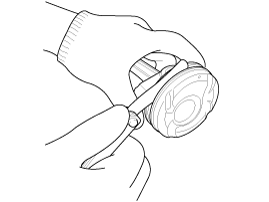
If the clearance is greater than maximum,
replace the piston. |
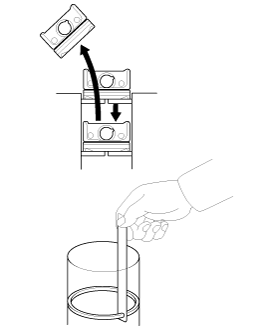
| 5. |
Inspect the piston ring end gap.
To measure the piston ring end gap, insert a
piston ring into the cylinder bore. Position the ring at right
angles to the cylinder wall by gently pressing it down with a
piston. Measure the gap with a feeler gauge. If the gap exceeds the
service limit, replace the piston rings. If the gap is too large,
recheck the cylinder bore inner diameter. If the bore is over the
service limit, the cylinder block must be rebored.
Piston ring
end gap
Standard
No.1 ring : 0.14 ~ 0.28mm (0.0079 ~
0.0138in)
No.2 ring : 0.30 ~ 0.45mm (0.0118 ~
0.0177in)
Oil ring : 0.20 ~ 0.40mm(0.0079 ~
0.0157in)
Limit
No.1 ring : 0.3mm(0.0118in)
No.2 ring : 0.5mm(0.0197in)
Oil ring :
0.8mm(0.0315in)
|
|
Piston Pins
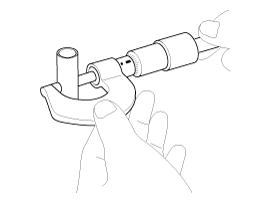
| 1. |
Measure the outer diameter of piston
pin
Piston pin
diameter :
19.997 ~ 20.000mm (0.7872 ~
0.7874in)
|
|
| 2. |
Measure the piston pin-to-piston
clearance.
Piston
pin-to-piston clearance :
0.004 ~ 0.013mm (0.0001 ~
0.0005in)
| |
| 3. |
Check the difference between the piston pin
outer diameter and the connecting rod small end inner
diameter.
Piston
pin-to-connecting rod interference :
0.005 ~ 0.019mm (0.0001 ~
0.0007in)
| |
| •
|
Thoroughly clean all parts to
assembled. |
| •
|
Before installing the parts, apply fresh
engine oil to all sliding and rotating
surfaces. |
| •
|
Replace all gaskets, O-rings and oil
seals with new
parts. | |
| 1. |
Install the piston cooling jet
(A).
Tightening
torque :
7.8 ~ 12.7N.m (0.8 ~ 1.3kgf.m, 5.8 ~
9.4lb-ft)
|

|
| 2. |
Assemble the piston and connecting
rod.
| (1) |
Use a hydraulic press for
installation. |
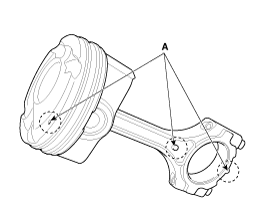
| (2) |
The piston front mark (A) and the
connecting rod front mark (A) must face the timing chain side
of the engine.
| |
| 3. |
Install the piston rings.
| (1) |
Install the oil ring coil spring and 2
side rails by hand. |
| (2) |
Using a piston ring expander, install
the 2 compression rings with the code mark facing
upward. |
| (3) |
Position the piston rings so that the
ring ends are as shown.
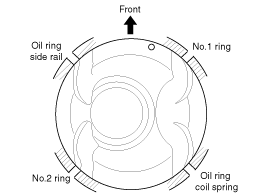
| |
| 4. |
Install the connecting rod
bearings.
| (1) |
Align the bearing (A) claw with the
groove of the connecting rod or connecting rod cap
(B). |
| (2) |
Install the bearings (A) in the
connecting rod and connecting rod cap (B).
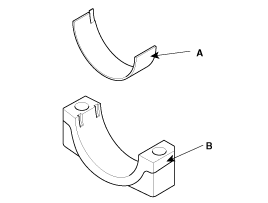
| |
| 5. |
Install the crankshaft main
bearings.
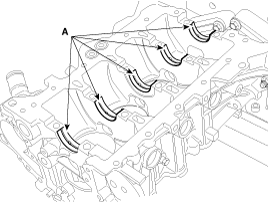
| (1) |
Align the bearing claw with the claw
groove of the cylinder block, push in the five upper
bearings(A).
|
Upper bearings have an oil groove
of oil holes ; Lower bearings do
not. |
|
| (2) |
Align the bearing claw with the claw
groove of the main bearing cap, and push in the 5 lower
bearings.
| |
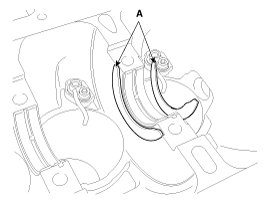
| 6. |
Install the thrust bearing.
Install the thrust bearing (A) on the No.3
journal position of the cylinder block with the oil grooves facing
outward.
|
| 7. |
Place the crankshaft on the cylinder
block. |
| 8. |
Place the main bearing caps on the cylinder
block. |
| 9. |
Install the main bearing cap
bolts.
|
The main bearing cap bolts are tightened
in 2 progressive steps.
If any of the bearing cap bolts in
broken or deformed, replace
it. |
| (1) |
Apply a light coat of engine oil on the
threads and under the bearing cap
bolts. |
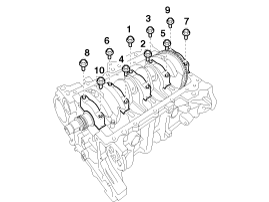
| (2) |
Install and uniformly tighten the 10
bearing cap bolts, in several passes, in the sequence
shown.
Tightening torque :
17.7~21.6Nm (1.8~2.2kgf.m,
13.0~15.9lb-ft) + 88~92°
|
|
Do not reuse the main bearing cap
bolts. | |
| (3) |
Check that the crankshaft turns
smoothly. | |
| 10. |
Check the crankshaft end
play. |
| 11. |
Install the piston and connecting rod
assemblies.
|
Before installing the piston, apply a
coat of engine oil to the ring grooves and cylinder
bores. |
| (1) |
Install the ring compressor, check that
the rings are securely in place, then position the piston in
the cylinder, and tap it in using the wooden handle of a
hammer. |
| (2) |
Stop after the ring compressor pops
free, and check the connecting rod-to-crank journal alignment
before pushing the piston into
place. |
| (3) |
Stop after the ring compressor pops
free, and check the connecting rod-to-crank journal alignment
before pushing the piston into place.
Tightening torque :
17.7~21.8Nm (1.8~2.2kgf.m,
13.0~15.9lb-ft) + 88~92°
|
|
Do not reuse the connecting rod
cap
bolts. | | |
| 12. |
Apply the sealant on the ladder
frame.
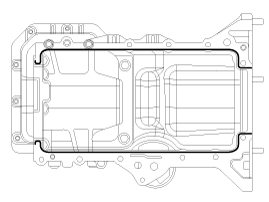
| •
|
Apply the sealant, THREE-BOND
1217H or LOCTITE 5900H on the ladder frame rail portion
and install it with in five
minutes. |
| •
|
If when sealant is applied to
cylinder block bottom position, sealant position to be
same with positon that is applied to ladder frame rail
position. |
| •
|
Apply sealant along the inner line
of the bolt
holes. | | |
| 13. |
Install the ladder frame (A).
Tightening
torque :
18.6 ~ 24.2N.m (1.9 ~ 2.4kgf.m, 13.7 ~
17.4lb-ft)
|

|
| 14. |
Install the rear oil seal.
(Refer to Cylinder Block - "Rear Oil
Swal") |
| 15. |
Install the oil screen (A).
Install a new gasket and oil screen with 2
bolts.
Tightening
torque :
19.6 ~ 26.5N.m (2.0 ~ 2.7kgf.m, 14.5 ~
19.5lb-ft)
|

|
| 16. |
Install the oil pan.
(Refer to Lubrication System - "Oil
Pan") |
| 17. |
Install the oil pressure switch.
(Refet to Lubrication System - "Oil Pressure
Switch") |
| 18. |
Install the knock sensor and the oil
filter.
(Refet to Lubrication System - "Oil
Filter") |
| 19. |
Install the oil level gauge
tube. |
| 20. |
Install the water jacket.
(Refer to Cylinder Block - "Water Jacket
Separator") |
| 21. |
Install the timing chain.
(Refet to Timing System - "Timing
Chain") |
| 22. |
Inatall the cylinder head.
(Refet to Cylindet Head Assembly - "Cylinder
Head") |
| 23. |
Disconnect the engine
stand. |
| 24. |
AT : Install the drive plate.
(Refet to Cylinder Block - "Drive
Plate") |
| 25. |
MT : Install the flywheel.
(Refet to Cylinder Block -
"Flywheel") |
| 26. |
Install the engine.
(Refer to Engine and transaxle assembly- "
Engine and transaxle
Assembly") | |